How to Use Temporary Hair Color Spray
Introduction to Temporary Hair Color Spray:
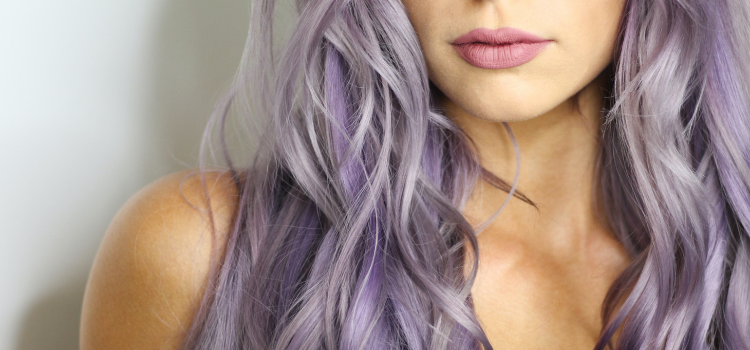
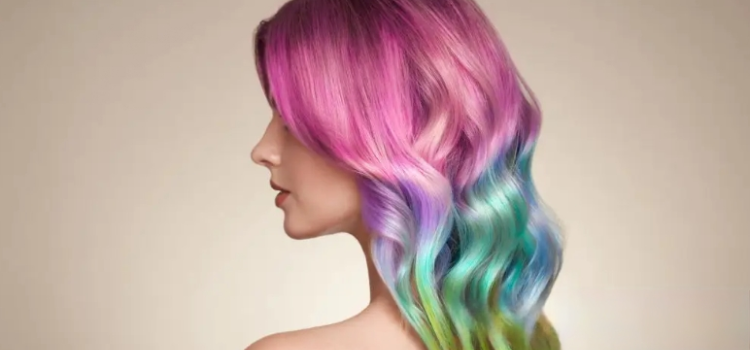
Hey there! Ready to add a splash of color to your life without the whole commitment thing? Well, you’re in the right place because we’re about to dive into the awesome world of temporary hair color spray. Imagine being able to rock a new shade whenever you feel like it – it’s like having a whole palette of possibilities at your fingertips!
Temporary hair color spray is like the superhero of hair transformations. It’s quick, easy, and lets you switch up your look without any long-term promises. Whether you’re gearing up for a big night out, a special event, or just want a spontaneous change, these sprays are your ticket to a whole new vibe.
So, buckle up as we walk you through picking the perfect color, prepping your hair canvas, and nailing the application for that flawless finish. We’re throwing in some styling ideas, tips to keep your color popping, and a guide on gracefully saying goodbye to your temporary hue when the time comes.
Whether you’re a color pro or a first-timer, consider this guide your sidekick on this fun ride. Let’s jump into the world of temporary hair color spray and unleash the creativity – because your hair deserves to be as bold and dynamic as you are!
How to Choosing the Right Temporary Hair Color Spray
Alright, let’s get down to the nitty-gritty of picking out the perfect temporary hair color spray. With a gazillion shades out there, it can be a bit overwhelming, but fear not – we’ve got your back.
Know Your Undertones:
Start by figuring out the undertones in your skin. Are you more on the warm side with yellows and peaches, or do you lean towards cool tones with pinks and blues? Knowing this will help you pick a color that harmonizes with your natural vibe.
Consider the Occasion:
Think about when and where you plan to rock your new hue. Subtle pastels might be awesome for a daytime look, while bold, vibrant colors could steal the show at a night out with friends.
Trial and Error (the Fun Part!):
Not sure which color will suit you best? Grab a few temporary hair color sprays in different shades and have a mini DIY runway session at home. It’s like a low-stakes fashion show for your hair.
Your Style, Your Color:
Your personal style should totally influence your color choice. If you’re all about those edgy vibes, go for something bold and striking. If you’re more laid-back, maybe a softer, natural tone is your jam.
Temporary vs. Natural Hair Color:
Consider how far you want to stray from your natural color. If you’re feeling adventurous, go wild with a completely different shade. If you want something more subtle, stick to a color that’s a variation of your current hue.
Brand Exploration:
Different brands offer different formulas and shades. Some might have that perfect pastel pink you’re after, while others excel in vibrant blues. Don’t hesitate to explore various brands to find the one that suits your vision..
Consider Your Wardrobe:
Your temporary hair color should play nice with your wardrobe. If you’re a fan of bright colors, you might want a more neutral hair shade. If your closet is a sea of neutrals, feel free to go all out with a bold color.
Preparing Your Hair for Temporary Hair Color Spray:
Alright, before we dive into the colorful world of temporary hair color spray, let’s make sure your hair is ready to rock that vibrant hue. Here’s a step-by-step guide to prep your locks for the ultimate color adventure:
Start with Clean Hair:
Wash your hair with a clarifying or sulfate-free shampoo to remove any product buildup or oils. Clean hair provides a smooth canvas for the color to adhere to.
Dry Thoroughly:
Make sure your hair is completely dry before applying the color spray. Wet or damp hair can dilute the color and affect the evenness of the application.
Detangle with Care:
Use a wide-tooth comb to gently detangle your hair. This helps the color spray distribute evenly and prevents clumps or uneven spots.
Section Your Hair:
Divide your hair into manageable sections using clips or hair ties. This makes it easier to apply the color evenly and ensures that you don’t miss any spots.
Cover Up:
Protect your clothing and skin by wearing an old shirt or draping a towel over your shoulders. Temporary color spray can be a bit rebellious and might end up where you least expect it!
Shield Your Surroundings:
Lay down newspapers, old towels, or cover surfaces where you’ll be applying the spray. This extra layer of protection is a lifesaver against accidental stains.
Gather Your Tools:
Have everything you need within reach – your chosen temporary hair color spray, a comb, and any additional styling tools you plan to use.
Shake, Shake, Shake:
Shake the color spray can vigorously before use. This ensures that the color is well-mixed and ready to coat your strands evenly.
Ready, Set, Spray:
Hold the spray can about 12-18 inches away from your hair. Start spraying from the roots and move towards the ends, covering each section thoroughly. Keep the nozzle in constant motion to avoid heavy concentration in one spot.
Comb Through Again:
After applying the color, comb through your hair once more to distribute the spray evenly and eliminate any tangles.
Sectioning Your Hair for Temporary Hair Color Spray:
Alright, let’s break down this whole sectioning thing in plain talk. It’s like creating a game plan for your hair color adventure. Here’s how to do it without making it feel like a complicated science experiment:
Grab Your Sidekick Tools:
First off, get yourself some hair clips or ties – your trusty sidekicks for this mission.
Picture Your Ideal Look:
Imagine how you want the color to play out. Are you going for an all-over vibe, or do you have a specific design in mind? This helps you decide how many sections you need.
Start with a Center Part:
Make a bold move and create a center part from your forehead down to the back of your neck. Boom, you’ve got two equal halves.
Clip or Tie One Half:
Hold up – just focus on one half for now. Clip or tie it up so you can give it your full attention.
Break It Down Even More:
Within that half, break things down further. You can go horizontal or vertical, whatever floats your boat. Each little subsection is like a chapter in your hair color story.
Clip or Tie the Subsections:
Don’t let these subsections mingle – clip or tie each one separately. This avoids color chaos and makes sure you’re covering every strand.
Switch to the Other Side:
Time to unveil the other half. Unclip or untie and repeat the process. This way, you’re not missing any spots, and you’re keeping things symmetrical.
Customize as You Go:
Adjust the size of your sections based on your style. If you’re feeling artsy, go for funky patterns. This is your chance to shine!
Check Your Work:
Before moving on, glance in the mirror. Make sure the color is playing nice and even. Adjust if needed – it’s your masterpiece.
Layers, Layers, Layers:
If your hair has layers, think about how the color will hit them. Section accordingly to keep the harmony intact.
Make it Fun:
This isn’t just about practicality; it’s a chance to get creative. Play around with your sections – make them wild and random or stick to a pattern. Enjoy the ride!
Combining Colors with Temporary Hair Color Spray:
Alright, let’s talk about turning your hair into a canvas of colors. Combining hues with temporary hair color spray is like creating your own masterpiece. Here’s the lowdown on mixing and matching for a vibrant, personalized look:
**1. Select Your Color Palette:
Choose a range of colors that complement each other. Think about the vibe you want – subtle pastels, bold neons, or maybe a mix of both.
**2. Prep Your Canvas:
Start with a clean, dry canvas – your hair. Follow the prep steps we discussed earlier to ensure the colors pop without any interference.
**3. Section Like a Pro:
Divide your hair into sections. If you’re going for a multi-color look, smaller sections allow for more precision.
**4. Choose a Base Color:
Pick a base color to set the foundation. This could be a natural shade or a color you want to dominate the look.
**5. Layer It On:
Now, it’s time to layer on the additional colors. Think strategically – do you want a gradient effect, distinct sections of color, or a wild mix? Spray each section according to your plan.
**6. Blend and Blur:
To create a seamless transition between colors, blend and blur where they meet. You can use your fingers or a comb to gently merge the shades for a smooth flow.
**7. Experiment with Techniques:
Get artsy! Try techniques like ombre (gradual blending from one color to another), streaks, or even a color block effect. The beauty is in the experimentation.
**8. Consider Color Wheel Harmony:
If you’re feeling a bit color theory-savvy, consider the color wheel. Colors opposite each other on the wheel (complementary colors) can create a striking contrast, while adjacent colors (analogous) provide a harmonious blend.
**9. Add Accents:
Introduce accent colors to highlight specific sections or create focal points. A pop of a contrasting color can take your look to the next level.
**10. Check the Balance:
– Step back and assess the balance of colors. Make sure each shade gets its moment without overwhelming the overall look.
**11. Set the Colors:
– To lock in your masterpiece, use a light mist of hairspray. This helps set the colors and extend their vibrancy.
**12. Enjoy Your Colorful Creation:
– Congratulations, you’ve just become a temporary hair color artist! Flaunt your creation with pride and rock those combined colors like the trendsetter you are.
Application Techniques for Temporary Hair Color Spray:
Alright, let’s dive into the hands-on part – applying that vibrant temporary hair color spray. It’s like unleashing your inner artist on a canvas of hair. Follow these techniques to get that flawless, professional-looking finish:
**1. Shake it Up:
Before anything else, give that spray can a good shake. You want the color well-mixed for an even application.
**2. Distance Matters:
Hold the spray can about 12 to 18 inches away from your hair. This distance ensures an even distribution and prevents the color from getting too concentrated in one spot.
**3. Start at the Roots:
Begin spraying from the roots and work your way down to the ends. This ensures that the color is evenly applied and that your roots get the attention they need.
**4. Keep it Moving:
No standing still! Keep the spray can in constant motion as you apply the color. This avoids any heavy buildup in one area and gives you that smooth, seamless look.
**5. Use Sections:
If you’re going for a specific style or multiple colors, work in sections. This allows for better control and precision. Clip or tie away the sections you’re not currently working on.
**6. Focus on the Underlayers:
For a more natural look, focus on the underlayers first. This way, when you move to the top layers, they naturally cover the colored sections, creating depth.
**7. Spray Evenly:
Aim for an even spray throughout each section. This consistency ensures that the color intensity is uniform, avoiding any surprises.
**8. Comb Through After Each Section:
Once you’ve sprayed a section, run a wide-tooth comb through it. This not only helps distribute the color but also detangles your hair, ensuring a smooth finish.
**9. Multiple Coats for Intensity:
If you’re after a bolder look, allow the first coat to dry and then apply additional coats as needed. This builds up the color intensity.
**10. Layering Colors:
– If you’re combining colors, start with the lighter shades first. This way, you can layer the darker colors over them for a more defined effect.
**11. Hold Steady for Highlights:
– For creating highlights, focus the spray on specific strands or sections, holding the can at a slight angle. This gives a natural highlighted appearance.
**12. Protect Your Face:
– When working on sections near your face, consider covering it with your hand or a cloth to avoid accidental color spray.
**13. Check for Evenness:
– Periodically step back and check for evenness. Adjust as needed to ensure a consistent and polished look.
**14. Setting the Color:
– Once you’re satisfied with the color application, set it in place by spraying a light mist of hairspray. This helps prevent the color from transferring and extends its longevity.
Setting the Color for Long-Lasting Brilliance:
Alright, you’ve just transformed your hair into a colorful masterpiece with temporary hair color spray. Now, let’s talk about setting that vibrant hue in place. Here’s how to make sure your creation stays bold and beautiful for as long as possible:
**1. Wait for it to Dry Naturally:
After applying the temporary hair color spray, give it some time to air dry. Don’t rush to style or touch your hair immediately. Let the color settle in.
**2. Avoid Heat Styling Right Away:
Resist the urge to hit your hair with hot styling tools right after applying the color. Give it a bit of time to set and avoid any potential color transfer.
**3. Lightly Mist with Hairspray:
To lock in that fabulous color, lightly mist your hair with hairspray. Hold the hairspray about 10-12 inches away from your hair and give it a gentle spray.
**4. Choose a Flexible Hold Hairspray:
Opt for a hairspray with a flexible hold. This helps set the color without making your hair too stiff or crunchy. You want your locks to stay touchably soft.
**5. Hold the Hairspray Can at an Angle:
When applying hairspray, hold the can at a slight angle rather than spraying directly from the top. This distributes the product more evenly and prevents overapplication in one spot.
**6. Allow the Hairspray to Dry:
Once you’ve misted your hair with hairspray, give it a little time to dry. This further helps set the color and ensures the hairspray does its job effectively.
**7. Avoid Overdoing It:
Less is more! You don’t need a ton of hairspray to set the color. A light, even mist is sufficient to keep things in place.
**8. Avoid Touching Frequently:
Try to resist constantly running your fingers through your hair. The more you touch it, the more likely the color is to fade.
**9. Protect Your Pillowcase:
If you’ve applied the color before bedtime, consider covering your pillowcase with an old towel to prevent color transfer while you sleep.
**10. Extend Color Life with Dry Shampoo:
– On non-wash days, use dry shampoo to refresh your hair and absorb excess oils. This helps maintain the color and extends its vibrancy.
**11. Wash with Care:
– When it’s time to wash your hair, use a gentle shampoo. Harsh shampoos can strip the color more quickly.
**12. Embrace the Fade Gracefully:
– Temporary hair color spray is meant to be temporary, so embrace the fading process gracefully. As the color naturally fades, you can experiment with new shades or go back to your original color.
Protective Measures for a Mess-Free Hair Color Adventure:
Alright, let’s talk about keeping the color where it belongs and avoiding any unexpected surprises. Taking protective measures is the secret sauce to a mess-free, stress-free temporary hair color spray session. Here’s your guide to ensuring the color stays on your hair, not your clothes or surroundings:
**1. Dress the Part:
Wear an old shirt or one that you don’t mind getting a little color on. Consider using a button-up shirt to make it easier to change without disturbing your freshly colored hair.
**2. Cover Your Shoulders:
Drape an old towel or cloth over your shoulders to create a makeshift cape. This not only protects your clothes but also makes you feel a bit like a hair color superhero.
**3. Protect Your Face:
If you’re working on sections near your face, consider covering it with your hand or a cloth to prevent accidental color spray on your skin.
**4. Gloves On:
Wear disposable gloves, especially if you’re dealing with vibrant or dark colors. This prevents your hands from turning into a rainbow and makes cleanup easier.
**5. Lay Down the Ground Rules:
Place newspapers, old towels, or plastic sheets on the floor or surfaces where you’ll be applying the color. This protects against accidental stains and makes cleanup a breeze.
**6. Clip or Tie Your Hair:
Section your hair and use clips or ties to keep the sections organized. This not only helps during application but also prevents color transfer between sections.
**7. Create a Color Application Zone:
Designate a specific area for applying the color, ideally near a sink. This way, if there’s any overspray, it’s contained in one spot, making cleanup easier.
**8. Use a Cape or Apron:
If you have a salon cape or apron, wear it to cover your front. This adds an extra layer of protection against accidental color splashes.
**9. Protect Your Ears and Neck:
Apply a thin layer of petroleum jelly around your ears and on the back of your neck. This acts as a barrier, making it easier to wipe off any color that may accidentally land on your skin.
**10. Check the Wind:
– If you’re applying the color outside, be mindful of the wind direction. You don’t want the color to end up on places it shouldn’t be.
**11. Avoid Light-Colored Furniture:
– If you’re applying the color indoors, be cautious of light-colored furniture. Darker colors are notorious for leaving stains, so take extra care around your surroundings.
**12. Keep Cleaning Supplies Handy:
– Have a damp cloth or wipes nearby to quickly address any accidental color splatters. The sooner you tackle them, the easier they are to clean.
Frequently Asked Questions (FAQ) – Temporary Hair Color Spray:
Q1: How long does temporary hair color spray last?
A1: The longevity of temporary hair color spray varies. Generally, it lasts for a few washes, typically around 1 to 2 weeks. The duration can be influenced by factors such as hair porosity, the brand of the spray, and how well you maintain it.
Q2: Can I use temporary hair color spray on dark hair?
A2: Absolutely! Temporary hair color spray works on all hair types and colors, including dark hair. Keep in mind that the result may be more subtle, and vibrant colors may require multiple coats for a noticeable effect.
Q3: How do I remove temporary hair color spray?
A3: Temporary hair color spray is usually easy to remove with regular shampoo and water. Ensure you use a gentle shampoo, and if needed, you can use a clarifying shampoo for quicker removal.
Q4: Can I apply temporary hair color spray on wet hair?
A4: It’s recommended to apply temporary hair color spray on dry hair for optimal results. Wet or damp hair may dilute the color, leading to uneven application.
Q5: Can I combine multiple colors in one application?
A5: Absolutely! Combining multiple colors is a fantastic way to create a unique and personalized look. Start with a base color and layer on additional shades for a creative and vibrant result.
Q6: Does temporary hair color spray damage hair?
A6: Temporary hair color spray is generally considered safe and doesn’t cause permanent damage. However, like any hair product, frequent use may lead to some dryness. Ensure you moisturize your hair regularly to maintain its health.
Q7: Can I use temporary hair color spray on styled hair?
A7: Yes, you can use temporary hair color spray on styled hair. However, for more even application, it’s recommended to apply the color on clean, unstyled hair. You can restyle your hair after the color has dried.
Q8: Can I use temporary hair color spray on children?
A8: Many temporary hair color sprays are formulated to be safe for children. However, it’s essential to check the product’s label for age recommendations and perform a patch test to ensure there are no adverse reactions.
Q9: How can I make the color last longer?
A9: To prolong the vibrancy of temporary hair color spray, avoid excessive sun exposure, limit the use of hot styling tools, and wash your hair with a color-safe, sulfate-free shampoo. Additionally, using a light hairspray can help set the color.
Q10: Can I use temporary hair color spray on synthetic hair or extensions?
A10: It’s advisable to check the product label and guidelines. Some temporary hair color sprays may be suitable for synthetic hair or extensions, but it’s essential to ensure compatibility to prevent damage.
How to Use Temporary Hair Color Spray Read More »